Docs
Micro-controllers, wireless transmission and database
Nextion Display to STM32 Blue Pill using STM32CubeIDE
Prerequisites
This project assumes you have already installed STM32CubeIDE. You need to have previously done a basic blink sketch with blue-pill using STM32CubeIDE. I have made a complete video from installing STM32CubeIDE to LED blink program. You can watch it by clicking this link. https://www.youtube.com/watch?v=kXg467nVd_A
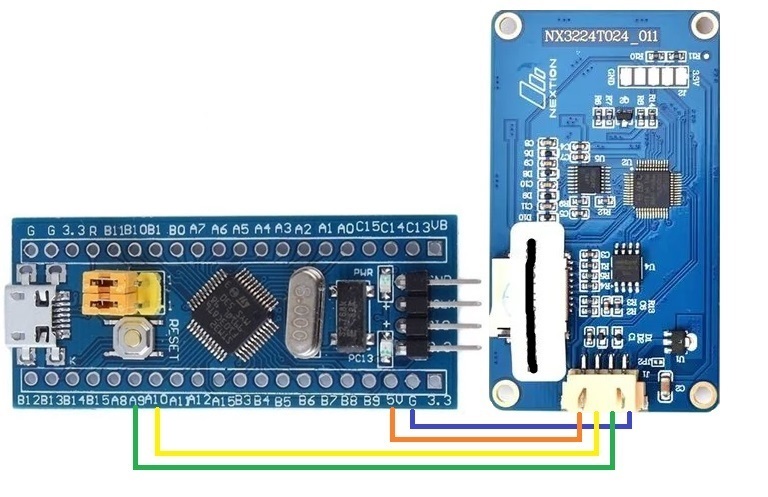
Wiring Diagram
STM32CubeIDE Settings
Enable USART1 asynchronous
Parameter Settings --> Basic Parameters --> Baud rate 9600
NVIC Settings --> USART1 global interrupt --> (Tick)
Set PC13 to GPIO_Output
Additional code on top of STM32CubeIDE generated code
/* USER CODE BEGIN Includes */
#include "string.h"
/* USER CODE END Includes */

/* USER CODE BEGIN 0 */
uint8_t rxBuffer[20] = {0};
uint8_t rxIndex = 0;
uint8_t rxData;
uint8_t slider;
uint8_t checkbox;
uint8_t radio;
uint8_t button;
void HAL_UART_RxCpltCallback(UART_HandleTypeDef *huart)
{
  if(huart->Instance==USART1)
  {
  // if the character received is other than hex FF, store the data in rxBuffer
  if(rxData!=255) // Check if Hex ff
  {
    if(rxIndex==0)
    {
      memset(rxBuffer,0,sizeof(rxBuffer));
    }
    rxBuffer[rxIndex++]=rxData;
  }
  else
  {
      switch (rxBuffer[0]) {
        case 1:
          slider = rxBuffer[1];
          break;
        case 2:
          checkbox = rxBuffer[1];
          break;
        case 3:
          radio = rxBuffer[1];
          break;
        case 4:
          button = rxBuffer[1];
          break;
        default:
          break;
      }
    rxIndex=0;
  }
  HAL_UART_Receive_IT(&huart1,&rxData,1); // Enabling interrupt receive again
  }
}
/* USER CODE END 0 */

  /* USER CODE BEGIN 2 */
  HAL_UART_Receive_IT(&huart1,&rxData,1);
  /* USER CODE END 2 */

  /* USER CODE BEGIN WHILE */
  while (1)
  {
    HAL_GPIO_TogglePin(GPIOC, GPIO_PIN_13);
    HAL_Delay(slider);
    /* USER CODE END WHILE */

    /* USER CODE BEGIN 3 */
  }
  /* USER CODE END 3 */